
Measuring Bay Window Curtain Poles
|
Bay
window poles •
|
|
Measuring for standard windows
Bay windows introduction
We pride ourselves on our unrivaled service for bay poles. We are the only company making bespoke bay poles that will supply you with a scale drawing of your bay showing the precise pole set-up. This way you can be assured that you know exactly what you are getting and that your pole will fit your bay without any uncertainty. If the drawing isn't right, or there is something that you want to change, it's easy for you to see and we can modify the drawing until the pole is how you want it.
To order a Bay Pole or make an enquiry:
- Step 1 - Measure bay window according to instructions below and send measurements and preferences in submission form
- Step 2 - We email you price estimate. Tell us if you want to continue with your enquiry
- Step 3 - If yes, we email diagrams of your bay and curtain pole. You confirm the drawings are OK or indicate changes or errors.
- Step 4 - We email confirmation of order and delivery dates. We will contact you for payment details.
- Step 5 - Your order is dispatched - usually within 2 weeks. We will take payment from your debit/credit card.
Note: We do not currently offer a measuring or fitting service. If you feel unable to measure for, or fit your curtain poles, we recommend that you find a suitably qualified tradesperson.
Measuring for bay windows
- Determine the type of bay you have from the diagrams below. In some cases we may need a full-size template to work from. If so, please contact us directly.
- Take measurements only along the area where the brackets and pole will be fitted. For example, if the brackets are to be fitted on the wall above above the window frame, that is the area that needs to be measured.
- Submit the measurements along with any additional comments in the bay submission form according to the bay shape. Please indicate on the form if there are any irregularities in your bay, sloping or uneven walls or obstructions, for example.
- We will work out the length of pole necessary, taking into account the bracket projection from the wall (don't add in your own estimate for this - we need the actual wall measurements). We will draw a diagram showing your bay with all the calculated dimensions and angles and with the pole and bracket positions shown and also give you an estimate of cost.
- It is your responsibility to check that the diagram conforms to your bay window . We will ask you to confirm that this drawing is correct before proceeding with any work.
A quick note on continuous curve poles: If you want a continuous curve pole, but have a bay with bends and angles, you will still need to measure your bay window according to its corresponding bay shape below. Tell us in the comments box that you want a curved pole and we will design one to fit into the bay shape (assuming it is practical and possible). Only measure your bay according to the continuous curve diagrams if the bay has a curved wall.
Measuring diagrams (back to top)
From your measurements we use a simple method of triangulation to create a CAD drawing of your bay.
|
Corner pole / 1 bend bay Determine start point (A) and end point (C) of curtain pole. Measure distances AB, BC and diagonal AC |
 |
|
2 bend Square bay Measure wall lengths AB, BC, CD and distances AD, AC. If additional pole returns are required, please indicate lengths at Ax and Dy |
 |
|
2 bend Angled bay Measure wall lengths AB, BC, CD and distances AD, AC. If additional pole returns are required, please indicate lengths at Ax and Dy |
 |
|
4 bend bay Measure wall lengths AB, BC, CD, DE, EF and distances AC, AD, AE, AF. If additional pole returns are required, please indicate lengths at Ax and Fy |
 |
|
5 bend bay Measure wall lengths AB, BC, CD, DE, EF, FG and distances AC, AD, AE, AF, AG. If additional pole returns are required, please indicate lengths at Ax and Gy |
 |
|
6 bend bay Measure wall lengths AB, BC, CD, DE, EF FG, GH and distances AC, AD, AE, AF, AG, AH. If additional pole returns are required, please indicate lengths at Ax and Hy |
 |
|
7 bend bay Measure wall lengths AB, BC, CD, DE, EF, FG, GH, HI and distances AC, AD, AE, AF, AG, AH, AI. If additional pole returns are required, please indicate lengths at Ax and Iy |
 |
|
Continuous curve bay Mark a point at the centre of the bay curve (C), then mark points halfway between A and C (B) and C and E (D). Measure distances AB, AC, AD, AE, EB, EC, ED. Measure only diagonal distances, do not measure the length of the wall directly. If additional pole returns are required, please indicate lengths at Ax and Ey |
 |
|
Continuous curve with straight ends Mark a point at the centre of the bay curve (D), then mark points halfway between B and D (C) and D and F (E). Measure distances AB, AC, AD, AE, AF, AG, GB, GC, GD, GE, GF If additional pole returns are required, please indicate lengths at Ax and Gy |
 |
Fixing brackets (back to top)
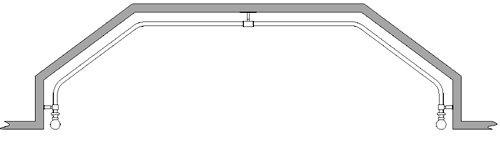
The minimum number of brackets required is three. As a rough guide, bay poles measuring over 3m in total length will probably require extra brackets. This can be dependent upon the weight of the curtains, the integrity of the surface being fixed into and the relative leverages acting on the pole. Square bay poles are more liable to twisting, for example, because of the greater leverage exerted on the pole at the bends, as compared to angled bays.
We can give an idea of the number of brackets necessary when we have drawn a diagram from your submitted measurements.
Pass-over brackets (back to top)
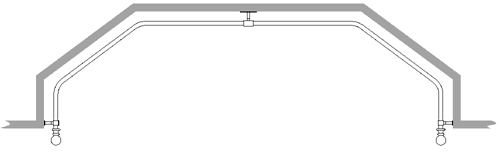
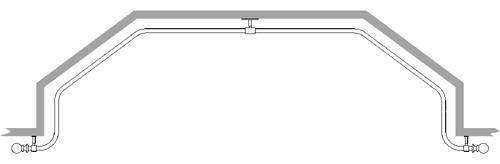
If a pole measures 3m or longer, we will usually recommend additional Pass-over brackets and rings that will enable the curtain to pass over the brackets unimpeded. This will allow one or two curtains to be used for a longer pole with multiple brackets. Please note that pass-over brackets will not work with tab-top or eyelet curtains. Only pass-over curtain rings can be used.
| Smaller bay poles usually require 3 brackets. |
|
|
|
|
| Larger bay poles require extra brackets. We will usually recommend additional pass-over brackets to allow two curtains to be used. |  |
 |
Pole projection from wall (back to top)
The standard pole projection from the wall is 60mm (6cm). This is also the standard hanging depth of the pole if it is fixed from the ceiling. This distance is the actual gap between the fixing surface (wall or ceiling) and the back or top edge of the pole when it is fixed. If you are fixing to battens this will increase the projection distance. You are given the option of choosing other distances of projection in the submission forms. Brackets of 100mm and over are charged more than shorter brackets.
| The default pole projection from the wall or ceiling is 6cm. Shorter or longer projections are possible. |
|

Pole ends configuration and Finial Display options (back to top)
Curtain pole will normally be trimmed so that when finials are attached they will not protrude out of the bay. If finials are not used, or if space is limited, pole can extend right to the edge of the bay. Any finials would protrude into the room. If more space is required, or for an alternative display option, the pole can have additional returns that bring the pole ends out of the bay and parallel to the walls of the room. Curtains can be drawn right out of the bay into the room to maximise light and space within the bay.
|
Finials within bay Finials retained within confines of bay. Pole length shortened accordingly. The standard display option. |
 |
|
Finials protruding from bay Pole extends right to edge of bay. Finials protrude into room. Frees up more pole space inside the bay. |
 |
|
Additional pole returns Added pole returns maximise space within bay and provide an alternative display option for finials. |
 |
Fixing to the ceiling (back to top)
If there is not enough space between window and ceiling to fix the brackets, fixing the pole to the ceiling is an option. You will need to make sure that you have a good surface to fix the brackets onto. We would recommend fixing directly into ceiling joists or onto wooden battens sited for the purpose. You will need to know the distance between the top of your windows and the ceiling. The standard hanging depth of the brackets is 60mm (the distance between the ceiling and the top edge of the curtain pole). Be aware that if you are fixing the brackets onto battens, this will increase hanging depth. Brackets can be made shorter or longer as required. Please contact us directly for further information.
What does it cost? (back to top)
Bay window poles carry an additional charge of £10 per bend on all pole diameters and £30 for a continuous curve pole, otherwise prices for finials and pole are the same as for standard curtain poles. We do not charge a 'set-up' fee. We use adjustable brackets on all bay poles to allow for irregularities and to make fitting the poles easier. If required, custom made brackets and accessories will attract an extra charge depending on complexity (this includes pass-over brackets).
If you would like an estimated price for your pole, without having to submit your bay measurements to us, you can use the instant price calculator by simply entering estimated pole size and pole preferences here. There is also a comprehensive list of our prices here.
Measuring Tips (back to top)
|
Use a steel tape measure as opposed to a flexible tape which can stretch and be inaccurate. Keep the tape taught and level. If possible, push the end of the tape tight into the bend and measure back to point A - doing this backwards can mean that you have to bend the tape back on itself to fit it into the corner, which can result in inaccuracies.
Print
a copy of the Bay Submission Form page that is relevant to your
bay and write the results into the boxes so that you don't mix up
the dimensions - it's easier than using the back of an envelope!
Transfer them to the web form when you have finished.
|
Some important considerations... (back to top)
- Take careful note of where you will site your brackets. Centre style brackets (back plate runs horizontally) will need a minimum 35mm of space above the window to fix into, which needs to be flat and even. Standard brackets (back plate runs vertically) need a minimum of 100mm of vertical space to fit into but aren't normally fitted above the window (see bracket diagrams)
- Some windows may have a hard concrete or steel lintel above them, making it difficult to fix screws into
- A weak fixing surface, such as plasterboard, may not be strong enough to take the combined weight of the pole and curtains. Wooden battens may be necessary to spread the load and allow the location of screws into ceiling joists
- We supply screws and wall plugs for fixing into masonry, but they will not be suitable for all fixing surfaces - plasterboard for example. You will need to supply your own fixings in these situations. Ask for advice at the hardware store if you are uncertain about what is suitable.
- Standard bay pole brackets have backplates that can be rotated to run horizontally or vertically
Measuring for standard windows

Copyright © The Northdowns Ironcraft Co. 2001-2018, all rights reserved E&OE. Terms & Conditions - Privacy